
電子書
如果您需要更詳細的範例
更完整的說明可以取得電子書來學習這個單元
http://glarethink.weebly.com/php2android.html
其他相關章節
情境
Google 在 API 22 以後將 HttpClient deprecated
改成的是用 HttpUrlConnection
這個是從 API 1 就存在的類別
因此不會有不相容的問題
如果我們要上傳一個檔案
可以使用這個類別來進行實作
程式碼下載
你可以直接到 GitHub 觀看或下載完整的程式碼
程式碼說明
首先主畫面跟之前範例一樣, 宣告一個 Button 跟一個 TextView
<?xml version="1.0" encoding="utf-8"?>
<RelativeLayout xmlns:android="http://schemas.android.com/apk/res/android"
    xmlns:tools="http://schemas.android.com/tools" android:layout_width="match_parent"
    android:layout_height="match_parent" android:paddingLeft="@dimen/activity_horizontal_margin"
    android:paddingRight="@dimen/activity_horizontal_margin"
    android:paddingTop="@dimen/activity_vertical_margin"
    android:paddingBottom="@dimen/activity_vertical_margin" tools:context=".MainActivity">
    <TextView
        android:id="@+id/msg"
        android:layout_width="match_parent"
        android:layout_height="wrap_content" />
    <Button
        android:id="@+id/upload"
        android:layout_below="@id/msg"
        android:text="Upload file"
        android:layout_width="wrap_content"
        android:layout_height="wrap_content" />
</RelativeLayout>
接著在主程式寫
public class MainActivity extends AppCompatActivity {
    private Button upload;
    private TextView resMsg;
    @Override
    protected void onCreate(Bundle savedInstanceState) {
        super.onCreate(savedInstanceState);
        setContentView(R.layout.activity_main);
        upload = (Button) findViewById(R.id.upload);
        resMsg = (TextView) findViewById(R.id.msg);
        upload.setOnClickListener(new View.OnClickListener() {
            @Override
            public void onClick(View v) {
                new Thread(new Runnable() {
                    @Override
                    public void run() {
                        FileUpload mFileUpload = new FileUpload();
                        mFileUpload.setOnFileUploadListener(new FileUpload.OnFileUploadListener() {
                            @Override
                            public void onFileUploadSuccess(final String msg) {
                                runOnUiThread(new Runnable() {
                                    @Override
                                    public void run() {
                                        resMsg.setText(msg);
                                    }
                                });

                            }

                            @Override
                            public void onFileUploadFail(final String msg) {
                                runOnUiThread(new Runnable() {
                                    @Override
                                    public void run() {
                                        resMsg.setText(msg);
                                    }
                                });
                            }
                        });
                        mFileUpload.doFileUpload(Environment.getExternalStorageDirectory().getAbsolutePath() + "/DCIM/butterfly.png");
                    }
                }).start();
            }
        });
    }

}
這邊稍微解釋一下, 一開始我們按下Button會去將圖片上傳到server,
由於這邊跟畫面沒有關係, 網路部分又會是屬於長任務的部分,
因此我們切出一個Thread讓它在背景執行,
對於Thread不熟悉的可以參考
執行緒套餐
所以程式碼就會變成
new Thread(new Runnable() {
                    @Override
                    public void run() {
                        FileUpload mFileUpload = new FileUpload();                       mFileUpload.doFileUpload(Environment.getExternalStorageDirectory().getAbsolutePath() + "/DCIM/butterfly.png");
                    }
                }).start();
這邊可以看到我們從手機內的/DCIM/下面上傳一張butterfly.png

可以透過模擬器將這張圖片塞到Environment.getExternalStorageDirectory()路徑下,
我的路徑是
/mnt/emulated/0/DCIM/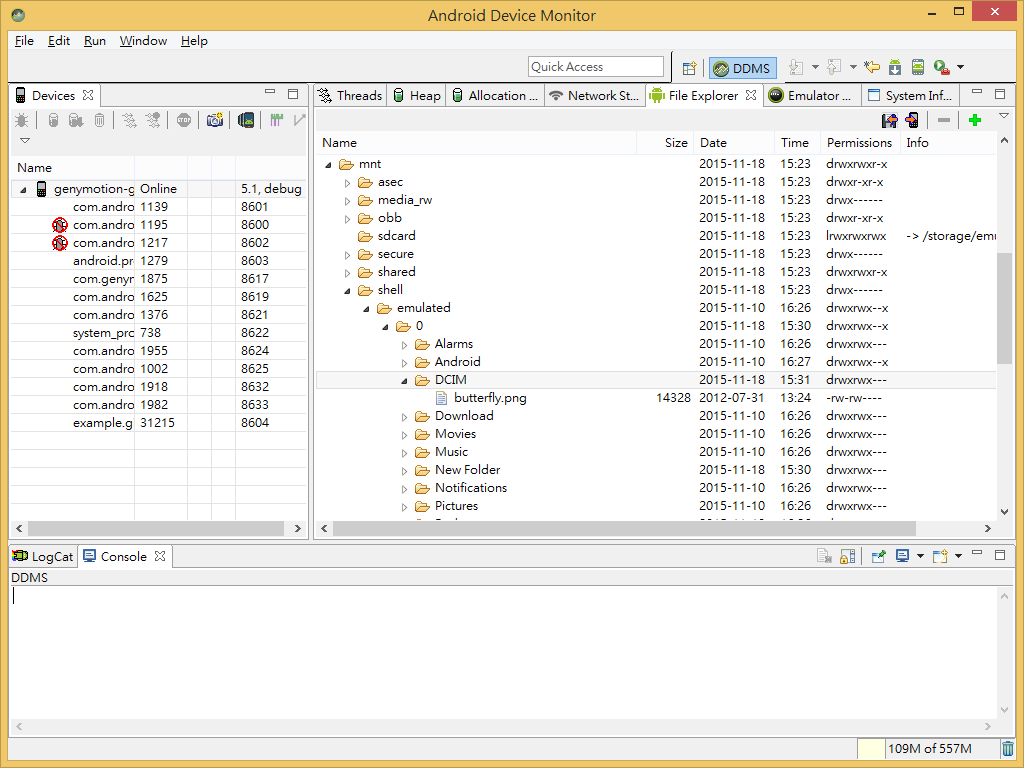
那麼就可以透過Thread在背景上傳了,
上傳該怎麼做呢?
先來看一下上傳的程式碼
public class FileUpload {
    private String mResponseMsg;
    private boolean isSucess;

    public interface OnFileUploadListener{
        void onFileUploadSuccess(String msg);
        void onFileUploadFail(String msg);
    }

    private OnFileUploadListener mOnFileUploadListener;

    public void setOnFileUploadListener(OnFileUploadListener listener){
        mOnFileUploadListener = listener;
    }

    public boolean isSucess() {
        return isSucess;
    }

    public FileUpload(){
        mResponseMsg = "";
        isSucess = false;
    }

    public void doFileUpload(String path) {
        HttpURLConnection conn = null;
        DataOutputStream dos = null;
        DataInputStream inStream = null;
        String existingFileName = path;
        String lineEnd = "\r\n";
        String twoHyphens = "--";
        String boundary = "*****";
        int bytesRead, bytesAvailable, bufferSize;
        byte[] buffer;
        int maxBufferSize = 1 * 1024 * 1024;
        String urlString = "http://192.168.56.1/upload.php";

        try {
            //------------------ CLIENT REQUEST
            FileInputStream fileInputStream = new FileInputStream(new File(existingFileName));
            // open a URL connection to the Servlet
            URL url = new URL(urlString);
            // Open a HTTP connection to the URL
            conn = (HttpURLConnection) url.openConnection();
            // Allow Inputs
            conn.setDoInput(true);
            // Allow Outputs
            conn.setDoOutput(true);
            // Don't use a cached copy.
            conn.setUseCaches(false);
            // Use a post method.
            conn.setRequestMethod("POST");
            conn.setRequestProperty("Connection", "Keep-Alive");
            conn.setRequestProperty("Content-Type", "multipart/form-data;boundary=" + boundary);
            dos = new DataOutputStream(conn.getOutputStream());
            dos.writeBytes(twoHyphens + boundary + lineEnd);
            dos.writeBytes("Content-Disposition: form-data; name=\"uploadedfile\";filename=\"" + existingFileName + "\"" + lineEnd);
            dos.writeBytes(lineEnd);
            // create a buffer of maximum size
            bytesAvailable = fileInputStream.available();
            bufferSize = Math.min(bytesAvailable, maxBufferSize);
            buffer = new byte[bufferSize];
            // read file and write it into form...
            bytesRead = fileInputStream.read(buffer, 0, bufferSize);

            while (bytesRead > 0) {

                dos.write(buffer, 0, bufferSize);
                bytesAvailable = fileInputStream.available();
                bufferSize = Math.min(bytesAvailable, maxBufferSize);
                bytesRead = fileInputStream.read(buffer, 0, bufferSize);

            }

            // send multipart form data necesssary after file data...
            dos.writeBytes(lineEnd);
            dos.writeBytes(twoHyphens + boundary + twoHyphens + lineEnd);
            // close streams
            fileInputStream.close();
            dos.flush();
            dos.close();
            isSucess = true;
        } catch (MalformedURLException e){
            isSucess = false;
        } catch (IOException e) {
            isSucess = false;
        }

        try {
            inStream = new DataInputStream(conn.getInputStream());
            String str;
            while ((str = inStream.readLine()) != null) {
                mResponseMsg = str;
            }
            inStream.close();

        } catch (IOException e) {
            isSucess = false;
            mResponseMsg = e.getMessage();
        }
        if(mOnFileUploadListener != null) {
            if (isSucess) {
                mOnFileUploadListener.onFileUploadSuccess(mResponseMsg);
            } else{
                mOnFileUploadListener.onFileUploadFail(mResponseMsg);
            }
        }
    }
}
好長一串啊~
接著是Server的php
<?php
    $target_path = "img/";
    $target_path = $target_path . basename( $_FILES['uploadedfile']['name']);

    if(move_uploaded_file($_FILES['uploadedfile']['tmp_name'], $target_path)) {
        echo "The file ".  basename( $_FILES['uploadedfile']['name'])." has been uploaded";
    } else{
        echo "There was an error uploading the file, please try again!";
        echo "filename: " .  basename( $_FILES['uploadedfile']['name']);
        echo "target_path: " .$target_path;
    }
?>
這邊是根據 StackOverflow 的文章所進行改寫的
核心部分就是利用 HttpUrlConnection 將 File 弄成 Stream 然後上傳
而外加的部分是
public interface OnFileUploadListener{
    void onFileUploadSuccess(String msg);
    void onFileUploadFail(String msg);
}

private OnFileUploadListener mOnFileUploadListener;

public void setOnFileUploadListener(OnFileUploadListener listener){
    mOnFileUploadListener = listener;
}

public boolean isSucess() {
    return isSucess;
}
建立監聽器來實作當 Server 上傳結束後通知我們的 TextView 來進行更新
對 Listener 不熟的可以參考
透過成功或失敗的參數來進行不同字串的傳送
if(mOnFileUploadListener != null) {
    if (isSucess) {
        mOnFileUploadListener.onFileUploadSuccess(mResponseMsg);
    } else{
        mOnFileUploadListener.onFileUploadFail(mResponseMsg);
    }
}
當我們按下去

到後台去看會發現檔案已經出現

如果關掉網路
